Two weeks ago we kicked off the OpenCV 3.0 install-fest with a tutorial on how to install OpenCV 3.0 and Python 2.7 on OSX.
Today I’m back again with another OSX tutorial — only this time we are going to compile OpenCV 3.0 with Python 3.4+ bindings!
That’s right! With the OpenCV 3.0 gold release, we officially have Python 3 support. It’s been a long time coming — and after being stuck in Python 2.7 land for many years, it’s a great feeling to fire up that Python 3 shell and be part of the future of the Python programming language.
In the rest of this article, I’ll show you how to compile and install OpenCV 3.0 with Python 3.4+ bindings.
How to Install OpenCV 3.0 and Python 3.4+ on OSX
As I mentioned at the top of this article, I have already covered how to install OpenCV 3.0 with Python 2.7 bindings on OSX in a previous post. As you’ll notice, most of the steps are very similar (and in some cases, identical), so I’ve trimmed down the explanations of each step to reduce redundancy. If you’re looking for more details on each step and command, please see the previous post where I go into a bit more detail.
With that said, let’s go ahead and get started installing OpenCV 3.0 with Python 3.4 bindings on OSX.
Step 1: Install Xcode
Before you can compile OpenCV on your system, you’ll first need to install Xcode, which is a set of developer tools provided by Apple for OSX and iOS development. Installing Xcode is very straightforward and can be accomplished by using the App Store application. Simply search for Xcode, click Get, followed by Install App, and your download will start:
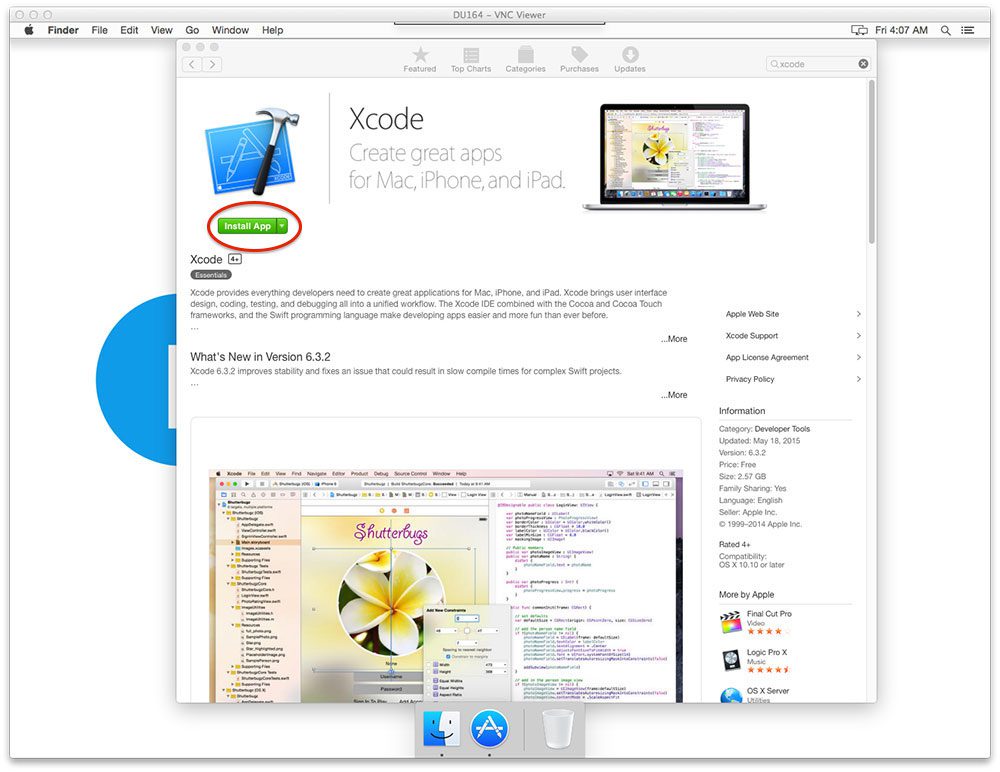
Figure 1: Installing Xcode on OSX.
The download itself is quite large (> 2gb), and Apple’s content delivery servers aren’t the fastest in the world, so you’ll probably want to go for a walk and get some fresh air while Xcode installs.
Step 2: Setup Homebrew
Homebrew is a package manager for OSX, similar to Ubuntu’s apt-get. We’ll be using Homebrew to help us install and manage some of OpenCV’s prerequisites and dependencies. To install Homebrew, just fire up a terminal and copy and paste the following commands:
$ cd ~
$ ruby -e "$(curl -fsSL https://raw.githubusercontent.com/Homebrew/install/master/install)"
$ brew update
Step 3: Install Python 3
OSX doesn’t ship with a copy of Python 3, so we need to install it via Homebrew:
$ brew install python3
$ brew linkapps
We also need to update our
PATHin
~/.bash_profile(if the file does not exist, create it) to indicate that Homebrew packages should be used before any system packages:
# Homebrew
export PATH=/usr/local/bin:$PATH
Let’s reload our
~/.bash_profileto ensure the changes have taken affect:
$ source ~/.bash_profile
And lastly, let’s confirm that Python 3.4 has been installed:
$ which python3
/usr/bin/local/python
$ python3 --version
Python 3.4.3
Step 4: Setup our Python 3.4 environment
Now we can focus on setting up our Python 3.4 environment for the OpenCV compilation.
Using virtualenv and virtualenvwrapper is definitely not a requirement to get OpenCV installed on your OSX machine, but I highly recommend using these packages! Being able to create separate Python environments for each of your projects is incredibly useful, so definitely consider using them!
Anyway, let’s install
virtualenvand
virtualenvwrapper:
$ pip3 install virtualenv virtualenvwrapper
Take note of the
pip3command. I am using
pip3to indicate that the
virtualenvand
virtualenvwrapperpackages should be installed for Python 3.4, not Python 2.7 (although these these packages can be used for both Python versions).
We’ll also need to update our
~/.bash_profilefile again by adding the following lines to the bottom of the file:
# Virtualenv/VirtualenvWrapper
export VIRTUALENVWRAPPER_PYTHON=/usr/local/bin/python3
source /usr/local/bin/virtualenvwrapper.sh
Followed by reloading our
.bash_profile:
$ source ~/.bash_profile
Now we’re getting somewhere. Let’s create our
cv3virtual environment that OpenCV will use to compile our Python 3.4 bindings against. This virtual environment will also hold any extra packages we want to store for computer vision and image processing development:
$ mkvirtualenv cv3 -p python3
Notice how I am specifying
-p python3to explicitly indicate that we want to create a virtual environment using the Python 3.4 binary.
After the
mkvirtualenvcommand has executed, we are dropped into our
cv3virtual environment. If you ever want to access this virtual environment again (and as I’ll demonstrate at the bottom of this post), just use the
workoncommand:
$ workon cv3
And you’ll be placed back into our
cv3virtual environment.
As far as Python prerequisites go, all we need is NumPy:
$ pip install numpy
Notice how I used
pipinstead of
pip3here — since we are in the
cv3virtual environment, the
virtualenvand
virtualenvwrapperscripts are smart enough to know that the
pipassociated with the
cv3environment should be used so explicitly using
pip3is not necessary.
Step 5: Install OpenCV prerequisites
In order to compile OpenCV from source, we’ll need a few developer tools:
$ brew install cmake pkg-config
Along with a few packages to handle reading various image formats from disk:
$ brew install jpeg libpng libtiff openexr
And another couple packages to optimize various routines inside OpenCV:
$ brew install eigen tbb
Step 6: Compile OpenCV
The first step in compiling OpenCV is to grab the source code from GitHub and checkout the 3.0.0 version:
$ cd ~
$ git clone https://github.com/Itseez/opencv.git
$ cd opencv
$ git checkout 3.0.0
We’ll also grab the opencv_contrib package as well which contains extra modules for OpenCV, such as feature detection and local invariant descriptors (SIFT, SURF, etc.), text detection, and more:
$ cd ~
$ git clone https://github.com/Itseez/opencv_contrib
$ cd opencv_contrib
$ git checkout 3.0.0
Now that the repositories are pulled down, we can create the
builddirectory:
$ cd ~/opencv
$ mkdir build
$ cd build
And use CMake to configure the build itself:
$ cmake -D CMAKE_BUILD_TYPE=RELEASE \
	-D CMAKE_INSTALL_PREFIX=/usr/local \
	-D PYTHON3_PACKAGES_PATH=~/.virtualenvs/cv3/lib/python3.4/site-packages \
	-D PYTHON3_LIBRARY=/usr/local/Cellar/python3/3.4.3/Frameworks/Python.framework/Versions/3.4/lib/libpython3.4m.dylib \
	-D PYTHON3_INCLUDE_DIR=/usr/local/Cellar/python3/3.4.3/Frameworks/Python.framework/Versions/3.4/include/python3.4m \
	-D INSTALL_C_EXAMPLES=ON \
	-D INSTALL_PYTHON_EXAMPLES=ON \
	-D BUILD_EXAMPLES=ON \
	-D BUILD_opencv_python3=ON \
	-D OPENCV_EXTRA_MODULES_PATH=~/opencv_contrib/modules ..
I’ve already explained what each of these options are in my previous post on installing OpenCV 3.0 with Python 2.7 bindings on OSX, so please refer to that post if you want a detailed explanation of each of the arguments.
The gist here is that you want to examine the output of CMake to ensure your Python 3 bindings will be compiled against the Python 3.4 interpreter installed via Homebrew and our
cv3virtual environment:
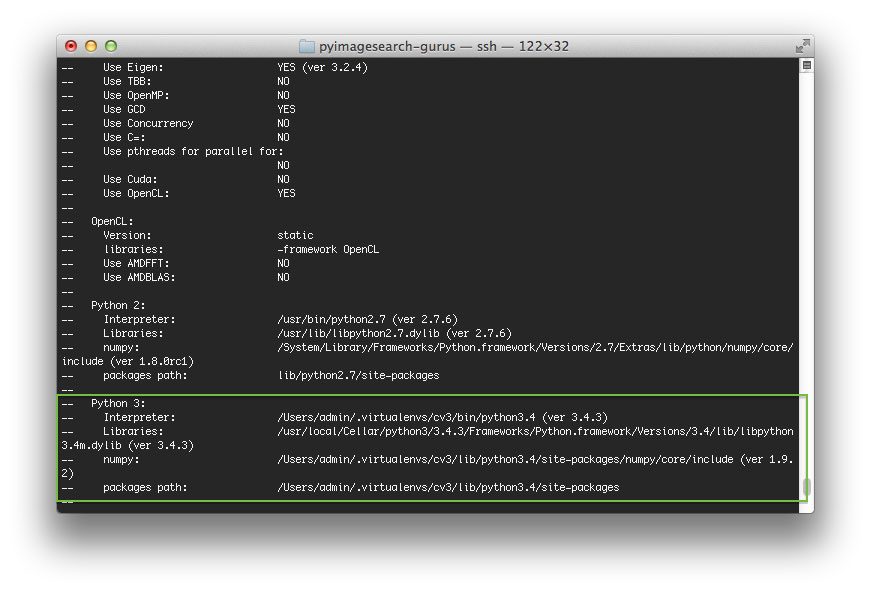
Figure 2: CMake has picked up the correct Python 3 interpreter, libraries, and site-packages path.
Notice how our Python 3 interpreter, Libraries, numpy version, and packages path have been picked up by CMake.
Another good check to make is that
python3is in the list of modules To be built:
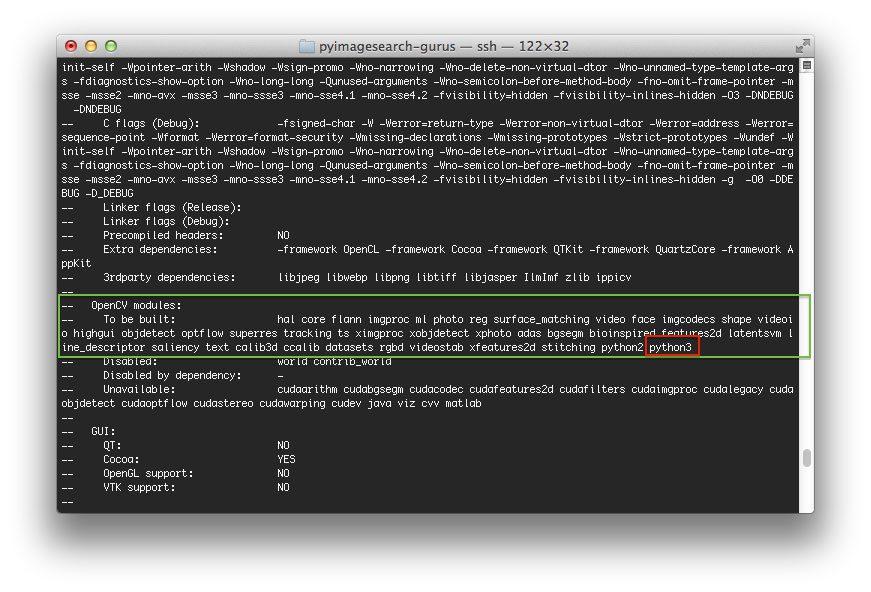
Figure 3: A good sanity check to perform prior to kicking off the compile process is to ensure that
“python3” is in the list of modules to be compiled.
If you do not see
python3in the list of modules to be built and is in the Unavailable list, then you’ll need to go back to the CMake step and ensure the paths to your
PYTHON3_PACKAGES_PATH,
PYTHON3_LIBRARY, and
PYTHON3_INCLUDE_DIRare correct. Again, I have provided a detailed explanation of each of these options in my previous post on installing OpenCV 3.0 on OSX, so please refer there for more information.
Assuming CMake has returned without any errors, we can now compile OpenCV:
$ make -j4
For a faster compilation, replace the 4 with the number of cores available on your system.
The compile time itself should not take more than 5-10 minutes, so grab a cup of coffee while OpenCV installs, and when you get back (assuming that OpenCV compiled without error, of course), you can install it:
$ make install
If for some reason you get an error related to having invalid permissions to install OpenCV, just prepend
sudoto the command:
$ sudo make install
Step 7: Verify the install
At this point, OpenCV 3.0 with Python 3.4+ bindings should be installed on your system. You can verify this by changing directory to where our
cv3virtual environment lives and checking for the
cv2.sofile:
$ cd ~/.virtualenvs/cv3/lib/python3.4/site-packages/
$ ls -l cv2.so
-rwxr-xr-x  1 admin  _developer  2013028 Jun 19 06:11 cv2.so
Sure enough, our OpenCV bindings are sitting in the
site-packagesdirectory for our
cv3virtual environment.
Note: You’ll also be able to find the cv2.so
file (again, which are your OpenCV bindings) in your build/lib
directory as well. The make install
script takes our cv2.so
file and copies it to our target site-packages
directory.
Finally, let’s verify our install by opening up a shell and importing OpenCV:
(cv3)74-80-245-164:~ admin$ python3
Python 3.4.3 (default, Jun 19 2015, 05:23:16)
[GCC 4.2.1 Compatible Apple LLVM 6.1.0 (clang-602.0.53)] on darwin
Type "help", "copyright", "credits" or "license" for more information.
>>> import cv2
>>> cv2.__version__
'3.0.0'
Congrats, you now have OpenCV 3.0 with Python 3.4+ bindings installed on your OSX system!
Summary
In this tutorial we learned how to compile and intall OpenCV 3.0 with Python 3.4+ bindings by hand using the CMake utility (if you’re looking for a tutorial on installing OpenCV 3.0 with Python 2.7+ bindings, please see my previous post). Granted, compiling by hand is not exactly the most fun experience — but it does give us complete and total control over the install.
Luckily, just a week ago an OpenCV 3.0 install script was created for Homebrew in the science tap. In future posts, I’ll demonstrate how to utilize Homebrew to greatly simplify the compile and install process, making our lives substantially easier.
All that said, I still recommend that you try installing OpenCV 3.0 by hand — Homebrew is nice, but you’ll never get the same full control like when you use CMake.
To be notified when the Homebrew + OpenCV 3.0 install post goes live, please enter your email address in the form below, and I’ll be sure to ping you when the tutorial is published.
The post Install OpenCV 3.0 and Python 3.4+ on OSX appeared first on PyImageSearch.