Today, we are going to start a new 3-part series of tutorials on shape detection and analysis.
Throughout this series, we’ll learn how to:
- Compute the center of a contour/shape region.
- Recognize various shapes, such as circles, squares, rectangles, triangles, and pentagons using only contour properties.
- Label the color of a shape.
While today’s post is a bit basic (at least in context of some of the more advanced concepts on the PyImageSearch blog recently), it still addresses a question that I get asked a lot:
“How do I compute the center of a contour using Python and OpenCV?
In today’s post, I’ll answer that question.
And in later posts in this series, we’ll build upon our knowledge of contours to recognize shapes in images.
Looking for the source code to this post?
Jump right to the downloads section.
OpenCV center of contour

Figure 1: An example image containing a set of shapes that we are going to compute the center of the contour for.
In above image, you can see a variety of shapes cut out from pieces of construction paper. Notice how these shapes are not perfect. The rectangles aren’t quite rectangular — and the circles are not entirely circular either. These are human drawn and human cut out shapes, implying there is variation in each shape type.
With this in mind, the goal of today’s tutorial is to (1) detect the outline of each shape in the image, followed by (2) computing the center of the contour — also called the centroid of the region.
In order to accomplish these goals, we’ll need to perform a bit of image pre-processing, including:
- Conversion to grayscale.
- Blurring to reduce high frequency noise to make our contour detection process more accurate.
- Binarization of the image. Typically edge detection and thresholding are used for this process. In this post, we’ll be applying thresholding.
Before we start coding, make sure you have the imutils Python package installed on your system:
$ pip install imutils
From there, we can go ahead and get started.
Open up a new file, name it
center_of_shape.py, and we’ll get coding:
# import the necessary packages
import argparse
import imutils
import cv2

# construct the argument parse and parse the arguments
ap = argparse.ArgumentParser()
ap.add_argument("-i", "--image", required=True,
	help="path to the input image")
args = vars(ap.parse_args())

# load the image, convert it to grayscale, blur it slightly,
# and threshold it
image = cv2.imread(args["image"])
gray = cv2.cvtColor(image, cv2.COLOR_BGR2GRAY)
blurred = cv2.GaussianBlur(gray, (5, 5), 0)
thresh = cv2.threshold(blurred, 60, 255, cv2.THRESH_BINARY)[1]
We start off on Lines 2-4 by importing our necessary packages, followed by parsing our command line arguments. We only need a single switch here,
--image, which is the path to where the image we want to process resides on disk.
We then take this image, load it from disk, and pre-process it by applying grayscale conversion, Gaussian smoothing using a 5 x 5 kernel, and finally thresholding (Lines 14-17).
The output of the thresholding operation can be seen below:
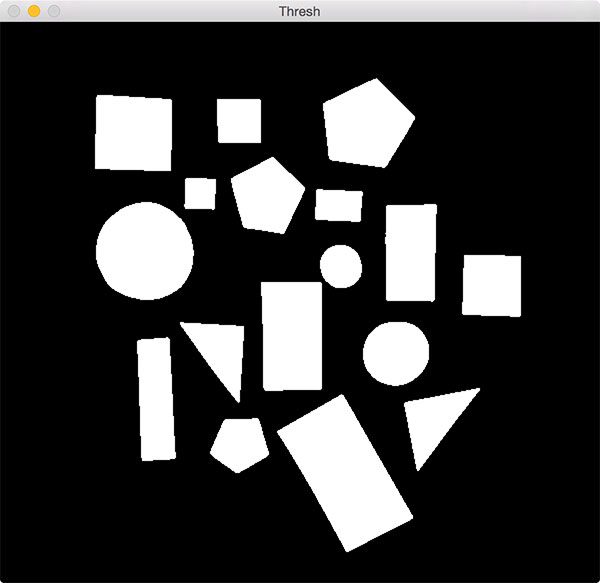
Figure 2: Thresholding our image returns a binary image, where the shapes appear as white on a black foreground.
Notice how after applying thresholding the shapes are represented as a white foreground on a black background.
The next step is to find the location of these white regions using contour detection:
# import the necessary packages
import argparse
import imutils
import cv2

# construct the argument parse and parse the arguments
ap = argparse.ArgumentParser()
ap.add_argument("-i", "--image", required=True,
	help="path to the input image")
args = vars(ap.parse_args())

# load the image, convert it to grayscale, blur it slightly,
# and threshold it
image = cv2.imread(args["image"])
gray = cv2.cvtColor(image, cv2.COLOR_BGR2GRAY)
blurred = cv2.GaussianBlur(gray, (5, 5), 0)
thresh = cv2.threshold(blurred, 60, 255, cv2.THRESH_BINARY)[1]

# find contours in the thresholded image
cnts = cv2.findContours(thresh.copy(), cv2.RETR_EXTERNAL,
	cv2.CHAIN_APPROX_SIMPLE)
cnts = cnts[0] if imutils.is_cv2() else cnts[1]
A call to
cv2.findContourson Lines 20 and 21 returns the set of outlines (i.e., contours) that correspond to each of the white blobs on the image. Line 22 then grabs the appropriate tuple value based on whether we are using OpenCV 2.4 or OpenCV 3. You can read more about how the return signature of
cv2.findContourschanged between OpenCV versions in this post.
We are now ready to process each of the contours:
# import the necessary packages
import argparse
import imutils
import cv2

# construct the argument parse and parse the arguments
ap = argparse.ArgumentParser()
ap.add_argument("-i", "--image", required=True,
	help="path to the input image")
args = vars(ap.parse_args())

# load the image, convert it to grayscale, blur it slightly,
# and threshold it
image = cv2.imread(args["image"])
gray = cv2.cvtColor(image, cv2.COLOR_BGR2GRAY)
blurred = cv2.GaussianBlur(gray, (5, 5), 0)
thresh = cv2.threshold(blurred, 60, 255, cv2.THRESH_BINARY)[1]

# find contours in the thresholded image
cnts = cv2.findContours(thresh.copy(), cv2.RETR_EXTERNAL,
	cv2.CHAIN_APPROX_SIMPLE)
cnts = cnts[0] if imutils.is_cv2() else cnts[1]

# loop over the contours
for c in cnts:
	# compute the center of the contour
	M = cv2.moments(c)
	cX = int(M["m10"] / M["m00"])
	cY = int(M["m01"] / M["m00"])

	# draw the contour and center of the shape on the image
	cv2.drawContours(image, [c], -1, (0, 255, 0), 2)
	cv2.circle(image, (cX, cY), 7, (255, 255, 255), -1)
	cv2.putText(image, "center", (cX - 20, cY - 20),
		cv2.FONT_HERSHEY_SIMPLEX, 0.5, (255, 255, 255), 2)

	# show the image
	cv2.imshow("Image", image)
	cv2.waitKey(0)
On Line 25 we start looping over each of the individual contours, followed by computing image moments for the contour region on Line 27.
In computer vision and image processing, image moments are often used to characterize the shape of an object in an image. These moments capture basic statistical properties of the shape, including the area of the object, the centroid (i.e., the center (x, y)-coordinates of the object), orientation, along with other desirable properties.
Here we are only interested in the center of the contour, which we compute on Lines 28 and 29.
From there, Lines 32-34 handle:
- Drawing the outline of the contour surrounding the current shape by making a call to
cv2.drawContours
. - Placing a white circle at the center
(cX, cY)
-coordinates of the shape. - Writing the text
center
near the white circle.
To execute our script, just open up a terminal and execute the following command:
$ python center_of_shape.py --image shapes_and_colors.png
Your results should look something like this:
Figure 3: Looping over each of the shapes individually and then computing the center (x, y)-coordinates for each shape.
Notice how each of the shapes are successfully detected, followed by the center of the contour being computed and drawn on the image.
Summary
In this lesson, we learned how to compute the center of a contour using OpenCV and Python.
This post is the first in a three part series on shape analysis.
In next week’s post, we’ll learn how to identify shapes in an image.
Then, two weeks from now, we’ll learn how to analyze the color of each shape and label the shape with a specific color (i.e., “red”, “green”, “blue”, etc.).
To be notified when these posts go live, be sure to enter your email address using the form below!
Downloads:
The post OpenCV center of contour appeared first on PyImageSearch.