
I’ll admit it: Compiling and installing OpenCV 3 on macOS Sierra was a lot more of a challenge than I thought it would be, even for someone who has a compiled OpenCV on hundreds of machines over his lifetime.
If you’ve tried to use one of my previous tutorials on installing OpenCV on your freshly updated Mac (Sierra or greater) you likely ran into a few errors, specifically with the
QTKit.hheader files.
And even if you were able to resolve the QTKit problem, you likely ran into more issues trying to get your CMake command configured just right.
In order to help resolve any issues, problems, or confusion when installing OpenCV with Python bindings on macOS Sierra (or greater) I’ve decided to create two hyper-detailed tutorials:
- This first tutorial covers how to install OpenCV 3 with Python 2.7 bindings on macOS.
- My second tutorial will come next week where I’ll demonstrate how to install OpenCV 3 with Python 3.5 bindings on macOS.
I decided to break these tutorials into two separate blog posts because they are quite lengthy.
Furthermore, tuning your CMake command to get it exactly right can be a bit of a challenge, especially if you’re new to compiling from OpenCV from source, so I wanted to take the time to devise a foolproof method to help readers get OpenCV installed on macOS.
To learn how to install OpenCV with Python 2.7 bindings on your macOS system, keep reading.
macOS: Install OpenCV 3 and Python 2.7
The first part of this blog post details why I am creating a new tutorial for installing OpenCV 3 with Python bindings on the Mac Operating System. In particular, I explain a common error you may have run across — the
QTKit.hheader issue from the now deprecated QTKit library.
From there, I provide super detailed instructions on how to install OpenCV 3 + Python 2.7 your macOS Sierra system or greater.
Avoiding the QTKit/QTKit.h file not found error
In the Mac OSX environment the QTKit (QuickTime Kit) Objective-C framework is used for manipulating, reading, and writing media. In OSX version 10.9 (Mavericks) QTKit was deprecated (source).
However, it wasn’t until the release of macOS Sierra that much of QTKit was removed and instead replaced with AVFoundation, the successor to QTKit. AVFoundation is the new framework for working with audiovisual media in iOS and macOS.
This created a big problem when compiling OpenCV on Mac systems — the QTKit headers were not found on the system and were expected to exist.
Thus, if you tried to compile OpenCV on your Mac using my previous tutorials your compile likely bombed out and you ended up with an error message similar to this:
fatal error:
      'QTKit/QTKit.h' file not found
#import <QTKit/QTKit.h>
        ^ 1 error generated. make[2]: *** [modules/videoio/CMakeFiles/opencv_videoio.dir/src/cap_qtkit.mm.o]
Error 1 make[1]: ***
[modules/videoio/CMakeFiles/opencv_videoio.dir/all] Error 2 make: ***
[all] Error 2
Even more problematic, both the tagged releases of OpenCV v3.0 and v3.1 do not include fixes to this issue.
That said, the latest commits to the OpenCV GitHub repo do address this issue; however, a new tagged release of v3.2 has yet to be released.
That said, I’m happy to report that by using the latest commit to OpenCV’s GitHub we can install OpenCV on macOS Sierra and greater.
The trick is that we need to use the
HEADof the repo as opposed to a tagged release.
Once OpenCV 3.2 is released I’m sure the QKit to AVFoundation migration will be included, but until then, if you want to install OpenCV 3 on your macOS system running Sierra or later, you’ll need to avoid using tagged releases and instead compile and install the development version of OpenCV 3.
How do I check my Mac Operating System version?
To check your Mac OS version click the Apple icon at the very top-left corner of your screen in the menu then select “About this Mac”.
A window should then pop up, similar to the one below:
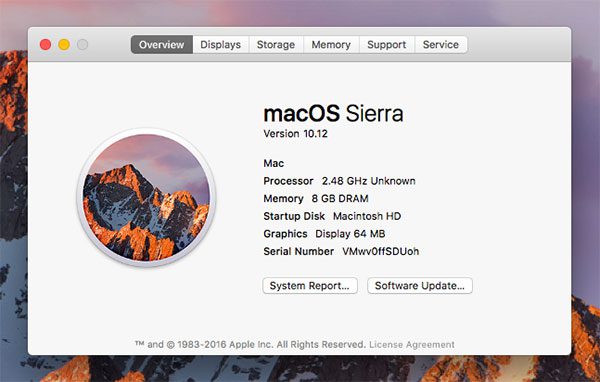
Figure 1: Checking your OS version on Mac. My machine is currently running macOS Sierra (10.12).
If you are running macOS Sierra or greater, you can use this tutorial to help you install OpenCV 3 with Python 2.7 bindings.
If you are using an older version of the Mac Operating System (Mavericks, Yosemite, etc.), please refer to my previous tutorials.
Step #1: Install Xcode
Before we can even think about compiling OpenCV, we first need to install Xcode, a full blown set of software development tools for the Mac Operating System.
Register for an Apple Developer account
Before downloading Xcode you’ll want to register with the Apple Developer Program (it’s free). If you have an existing Apple ID (i.e., what you use to sign in to iTunes with) this is even easier. Simply provide some basic information such as name, address, etc. and you’ll be all set.
From there, the easiest way to download Xcode is via the App Store. Search for “Xcode” in the search bar, select it, and then click the “Get” button:
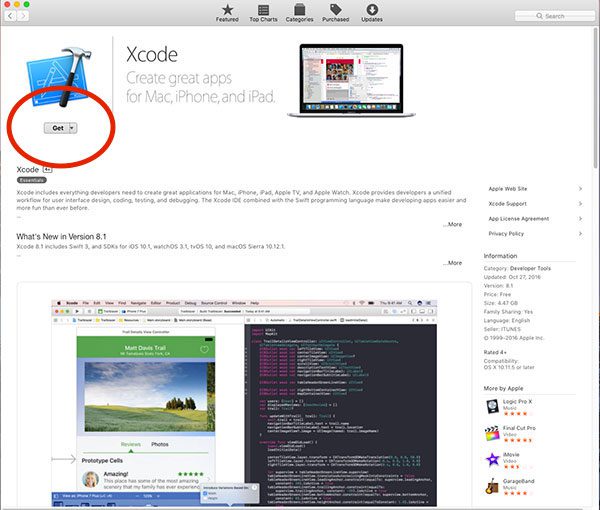
Figure 2: Selecting Xcode from the Apple App Store.
Xcode will then start to download and install. On my machine the download and install process took approximately 30 minutes.
Accept the Apple Developer license
Assuming this is the first time you’ve installed or used Xcode, you’ll need to accept the developer license (otherwise, you can skip this step). I prefer using the terminal whenever possible. You can use the following command to accept the Apple Developer License:
$ sudo xcodebuild -license
Scroll to the bottom of the license and accept it.
Install Apple Command Line Tools
Finally, we need to install the command line tools. These tools include packages such as make, GCC, clang, etc. This is absolutely a required step, so make sure you install the command line tools:
$ sudo xcode-select --install
After you enter the command above a window will pop up confirming that you want to install the command line tools:
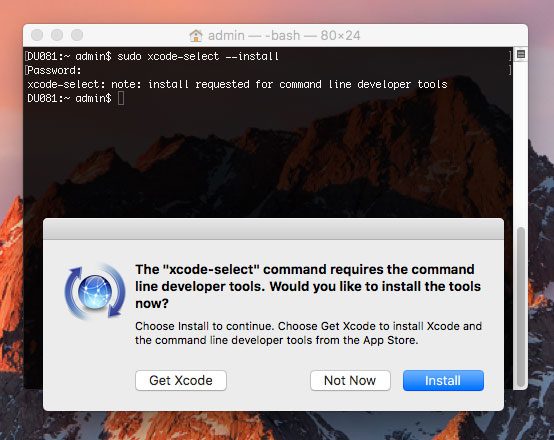
Figure 3: Installing the Apple Command Line Tools on macOS.
Click “Install” and the Apple Command Line Tools will be downloaded and installed on your system. This should take less than 5 minutes.
Step #2: Install Homebrew
We are now ready to install Homebrew, a package manager for macOS. Think of Homebrew as similar equivalent to apt-get for Ubuntu and Debian-based systems.
Installing Homebrew is simple. Simply copy and paste the command underneath the “Install Homebrew” section of the Homebrew website (make sure you copy and paste the entire command) into your terminal:
$ /usr/bin/ruby -e "$(curl -fsSL https://raw.githubusercontent.com/Homebrew/install/master/install)"
Once Homebrew is installed you should update it to ensure the most recent package definitions are downloaded:
$ brew update
The last step is to update our
~/.bash_profilefile. This file may exist on your system already or it may not. In either case, open it with your favorite text editor (I’ll use
nanoin this case):
$ nano ~/.bash_profile
And insert the following lines at the bottom of the file (if
~/.bash_profiledoes not exist the file will be empty, so simply insert the following lines):
# Homebrew
export PATH=/usr/local/bin:$PATH
The above snippet updates your
PATHvariable to look for binaries/libraries along the Homebrew path before searching your system path.
After updating the file save and exit the editor. I have included a screenshot of my
~/.bash_profilebelow:
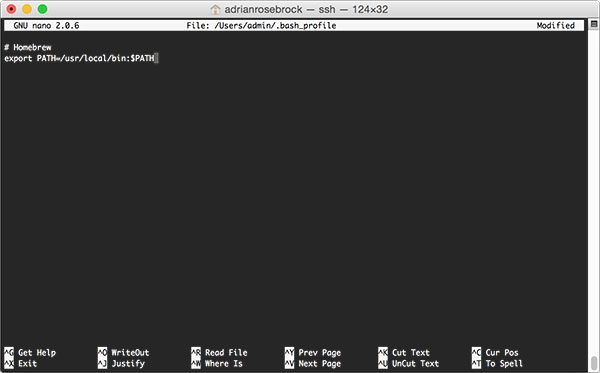
Figure 4: Updating my .bash_profile file to include Homebrew.
You should then use the
sourcecommand to ensure the changes to your
~/.bash_profilefile are manually reloaded:
$ source ~/.bash_profile
This command only needs to be executed once. Whenever you login, open up a new terminal, etc., your
.bash_profilewill will automatically be loaded and sourced for you.
Step #3: Setup Homebrew for Python 2.7 and macOS
In general, you do not want to develop against the system Python as your main interpreter. This is considered bad form. The system version of Python should (in an ideal world) serve only one purpose — support system operations.
Instead, you’ll want to install your own version of Python that is independent of the system one. Installing Python via Homebrew is dead simple:
$ brew install python
Note: This tutorial covers how to install OpenCV 3 with Python 2.7 bindings on macOS. Next week I’ll be covering OpenCV 3 with Python 3 bindings — if you want to use Python 3 with OpenCV on macOS, please refer to next week’s blog post.
After the install command finishes we just need to run the following command to complete the Python installation:
$ brew linkapps python
To confirm that we are using the Homebrew version of Python rather than the system version of Python you should use the
whichcommand:
$ which python
/usr/local/bin/python
Important: Be sure to inspect the output of the
whichcommand! If you see
/usr/local/bin/pythonthen you are correctly using the Hombrew version of Python.
However, if the output is
/usr/bin/pythonthen you are incorrectly using the system version of Python. If this is the case then you should ensure:
- Homebrew installed without error.
- The
brew install python
command completed successfully. - You have properly updated your
~/.bash_profile
file and reloaded the changes usingsource
. This basically boils down to making sure your~/.bash_profile
looks like mine above in Figure 4.
Step #4: Install virtualenv, virtualenvwrapper, and NumPy
We are now ready to install three Python packages: virtualenv and virtualenvwrapper, along with NumPy, used for numerical processing.
Installing virtualenv and virtualenvwrapper
The
virtualenvand
virtualenvwrapperpackages allow us to create separate, independent Python environments for each project we are working on. I’ve mentioned Python virtual environments many times before, so I won’t rehash what’s already been said. Instead, if you are unfamiliar with Python virtual environments, how they work, and why we use them, please refer to the first half of this blog post. There is also an excellent tutorial on the RealPython.com blog that takes a deeper dive into Python virtual environments.
To install
virtualenvand
virtualenvwrapper, just use
pip:
$ pip install virtualenv virtualenvwrapper
After these packages have been installed we once again need to update our
~/.bash_profilefile:
# Virtualenv/VirtualenvWrapper
source /usr/local/bin/virtualenvwrapper.sh
After updating, your
~/.bash_profileshould look similar to mine below:
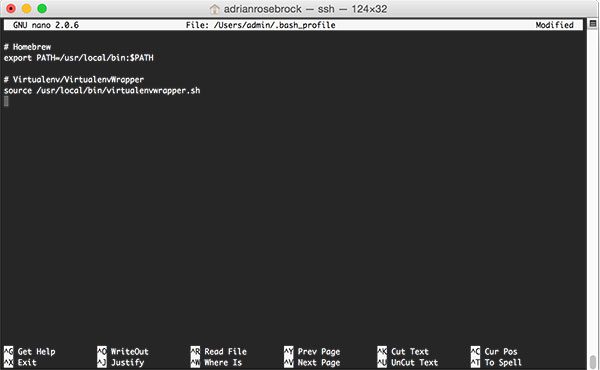
Figure 5: Update your .bash_profile file to include virtualenv/virtualenvwrapper.
Save and exit your text editor, followed by refreshing your environment using the
sourcecommand:
$ source ~/.bash_profile
Again, this command only needs to be executed once. Whenever you open up a new terminal the contents of your
.bash_profilefile will be automatically loaded for you.
Creating your Python virtual environment
Assuming the above commands completed without error, we can now use the
mkvirtualenvcommand to create our Python virtual environment. We’ll name this Python virtual environent
cv:
$ mkvirtualenv cv
This command will create a Python environment that is independent from all other Python environments on the system (meaning this environment has its own separate
site-packagesdirectory, etc.). This is the virtual environment we will be using when compiling and installing OpenCV.
The
mkvirtualenvcommand only needs to be executed once. If you ever need to access this virtual environment again, just use the
workoncommand:
$ workon cv
To validate that you are in the
cvvirtual environment, simply examine your command line — if you see the text
(cv)preceding the prompt, then you are in the
cvvirtual environment:
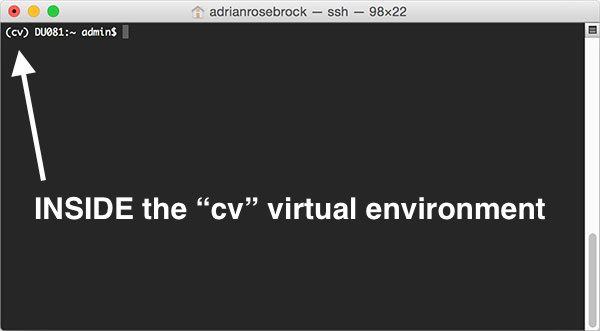
Figure 6: Make sure you see the “(cv)” text on your prompt, indicating that you are in the cv virtual environment.
Otherwise, if you do not see the
cvtext, then you are not in the
cvvirtual environment:
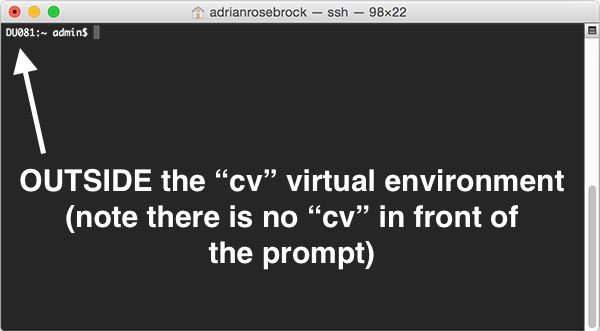
Figure 7: If you do not see the “(cv)” text on your prompt, then you are not in the cv virtual environment and you need to run the “workon” command to resolve this issue before continuing.
To access the
cvvirtual environment simply use the
workoncommand mentioned above.
Install NumPy
The last step is to install NumPy, a scientific computing package for Python.
Ensure you are in the
cvvirtual environment (otherwise NumPy will be installed into the system version of Python rather than the
cvenvironment) and then install NumPy using
pip:
$ pip install numpy
Step #5: Install OpenCV prerequisites using Homebrew
OpenCV requires a number of prerequisites, all of which can be installed easily using Homebrew.
Some of these packages are related to tools used to actually build and compile OpenCV while others are used for image I/O operations (i.e., loading various image file formats such as JPEG, PNG, TIFF, etc.)
To install the required prerequisites for OpenCV on macOS, just execute these commands:
$ brew install cmake pkg-config
$ brew install jpeg libpng libtiff openexr
$ brew install eigen tbb
Step #6: Download the OpenCV 3 source from GitHub
As I mentioned at the top of this tutorial, we need to compile OpenCV from the latest commit, not a tagged release. This requires us to download the OpenCV GitHub repo:
$ cd ~
$ git clone https://github.com/opencv/opencv
Along with the opencv_contrib repo:
$ git clone https://github.com/opencv/opencv_contrib
Step #7: Configuring OpenCV 3 and Python 2.7 via CMake on macOS
In this section I detail how to configure your OpenCV 3 + Python 2.7 on macOS Sierra build using CMake.
First, I demonstrate how to setup your build by creating the
builddirectory.
I then provide a CMake build template that you can use. This template requires you to fill in two values — the path to your
libpython2.7.dylibfile and the path to your
Python.hheaders.
I will help you find and determine the correct values for these two paths.
Finally, I provide an example of a fully completed CMake command. However, please take note that this command is specific to my machine. Your CMake command may be slightly different due to the paths specified. Please read the rest of this section for more details.
Setting up the build
In order to compile OpenCV 3 with Python 2.7 support for macOS we need to first set up the build. This simply amounts to changing directories into
opencvand creating a
builddirectory:
$ cd ~/opencv
$ mkdir build
$ cd build
OpenCV 3 + Python 2.7 CMake template for macOS
In order to make the compile and install process easier, I have constructed the following template OpenCV 3 + Python 2.7 CMake template:
$ cmake -D CMAKE_BUILD_TYPE=RELEASE \
    -D CMAKE_INSTALL_PREFIX=/usr/local \
    -D OPENCV_EXTRA_MODULES_PATH=~/opencv_contrib/modules \
    -D PYTHON2_LIBRARY=YYY \
    -D PYTHON2_INCLUDE_DIR=ZZZ \
    -D PYTHON2_EXECUTABLE=$VIRTUAL_ENV/bin/python \
    -D BUILD_opencv_python2=ON \
    -D BUILD_opencv_python3=OFF \
    -D INSTALL_PYTHON_EXAMPLES=ON \
    -D INSTALL_C_EXAMPLES=OFF \
    -D BUILD_EXAMPLES=ON ..
Looking at this template I want to point out a few things to you:
BUILD_opencv_python2=ON
: This indicates that we want to build Python 2.7 bindings for our OpenCV 3 install.BUILD_opencv_python3=OFF
: Since we are compiling Python 2.7 bindings we need to explicitly state that we do not want Python 3 bindings. Failure to include these two switches can cause problems in the CMake configuration process.PYTHON2_LIBRARY=YYY
: This is the first value you need to fill in yourself. You will need to replaceYYY
with the path to yourlibpython2.7.dylib
file (I will help you find it in the next section).PYTHON2_INCLUDE_DIR
: This is the second value you will need to fill in. You need to replaceZZZ
with the path to yourPython.h
headers (again, I’ll help you determine this path).
Determining your Python 2.7 library and include directory
Let’s start by configuring your
PYTHON2_LIBRARYvalue. This switch should point to our
libpython2.7.dylibfile. You can find this file within many nested subdirectories of
/usr/local/Cellar/python/. To find the exact path to the
libpython2.7.dylibfile, just use the
lscommand along with the wildcard asterisk:
$ ls /usr/local/Cellar/python/2.7.*/Frameworks/Python.framework/Versions/2.7/lib/python2.7/config/libpython2.7.dylib
/usr/local/Cellar/python/2.7.12_2/Frameworks/Python.framework/Versions/2.7/lib/python2.7/config/libpython2.7.dylib
Take note of the output of this command — this is the full path to your libpython2.7.dylib
file and will replace YYY
in the CMake template above.
Next, let’s determine the
PYTHON2_INCLUDE_DIR. This path should point to the
Python.hheaders used to generate our actual OpenCV + Python 2.7 bindings.
Again, we’ll use the same
lsand wildcard trick here to determine the proper path:
$ ls -d /usr/local/Cellar/python/2.7.*/Frameworks/Python.framework/Versions/2.7/include/python2.7/
/usr/local/Cellar/python/2.7.12_2/Frameworks/Python.framework/Versions/2.7/include/python2.7/
The output of the
ls -dcommand is our full path to the
Python.hheaders. This value will replace
ZZZin the CMake template.
Filling in the CMake template
Now that you’ve determined the
PYTHON2_LIBRARYand
PYTHON2_INCLUDE_DIRvalues you need to update the CMake command with these values.
On my particular machine the full CMake command looks like this:
$ cmake -D CMAKE_BUILD_TYPE=RELEASE \
    -D CMAKE_INSTALL_PREFIX=/usr/local \
    -D OPENCV_EXTRA_MODULES_PATH=~/opencv_contrib/modules \
    -D PYTHON2_LIBRARY=/usr/local/Cellar/python/2.7.12_2/Frameworks/Python.framework/Versions/2.7/lib/python2.7/config/libpython2.7.dylib \
    -D PYTHON2_INCLUDE_DIR=/usr/local/Cellar/python/2.7.12_2/Frameworks/Python.framework/Versions/2.7/include/python2.7/ \
    -D PYTHON2_EXECUTABLE=$VIRTUAL_ENV/bin/python \
    -D BUILD_opencv_python2=ON \
    -D BUILD_opencv_python3=OFF \
    -D INSTALL_PYTHON_EXAMPLES=ON \
    -D INSTALL_C_EXAMPLES=OFF \
    -D BUILD_EXAMPLES=ON ..
However, please do not copy and paste my exact CMake command — make sure you have used the instructions above to properly determine your
PYTHON2_LIBRARYand
PYTHON2_INCLUDE_DIRvalues.
Once you’ve filled in these values execute your
cmakecommand and your OpenCV 3 + Python 2.7 build will be configured.
As an example, take a look at the
Python 2section of the output from my configuration:

Figure 8: Ensuring that Python 2.7 will be used when compiling OpenCV 3 for macOS.
You’ll want to make sure that:
- The
Interpreter
points to the Python binary in yourcv
virtual environment. Libraries
points to yourlibpython2.7.dylib
file.- The
numpy
version being utilized is the one you installed in yourcv
virtual environment.
Step #8: Compile and install OpenCV on macOS
Assuming you
cmakecommand exited without error and your
Python 2section is properly configured, you can now compile OpenCV:
$ make -j4
The
-jswitch controls the number of parallel processes to compile OpenCV. We normally set this to the number of available cores/processors on our machine. Since I’m on a quad-core system, I use
-j4.
OpenCV can take awhile to compile (30-90 minutes) depending on the speed of your machine. A successful compile will end with a 100% completion:
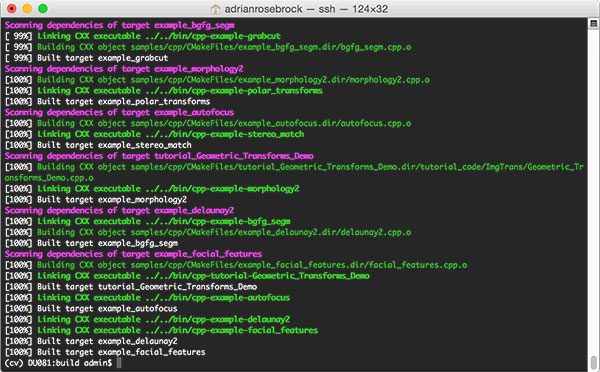
Figure 9: Successfully compiling OpenCV 3 from source with Python 2.7 bindings on macOS.
Assuming that OpenCV compiled without error, you can now install it on your macOS system:
$ sudo make install
Step #9: Sym-link your OpenCV 3 + Python 2.7 bindings
After running
make installyou should now see a file named
cv2.soin
/usr/local/lib/python2.7/site-packages:
$ cd /usr/local/lib/python2.7/site-packages/
$ ls -l cv2.so
-rwxr-xr-x  1 root  admin  3694564 Nov 15 09:20 cv2.so
The
cv2.sofile is your actual set of OpenCV 3 + Python 2.7 bindings.
However, we need to sym-link these bindings into our
cvvirtual environment. This can be accomplished using the following commands:
$ cd ~/.virtualenvs/cv/lib/python2.7/site-packages/
$ ln -s /usr/local/lib/python2.7/site-packages/cv2.so cv2.so
$ cd ~
Step #10: Testing your OpenCV install on macOS
To verify that your OpenCV 3 + Python 2.7 installation on macOS is working:
- Open up a new terminal.
- Execute the
workon
command to access thecv
Python virtual environment. - Attempt to import the Python + OpenCV bindings.
Here are the exact steps to test the install process:
$ workon cv
$ python
Python 2.7.12 (default, Oct 11 2016, 05:20:59)
[GCC 4.2.1 Compatible Apple LLVM 8.0.0 (clang-800.0.38)] on darwin
Type "help", "copyright", "credits" or "license" for more information.
>>> import cv2
>>> cv2.__version__
'3.1.0-dev'
>>>
Note: Take note of the -dev
in the cv2.__version__
. This indicates that we are using the development version of OpenCV and not a tagged release. Once OpenCV 3.2 is released these instructions can be updated to simply download a .zip of the tagged version rather than having to clone down the entire repositories.
I’ve also included a screenshot below that utilizes these same steps. As you can see, I can access my OpenCV 3 bindings from Python 2.7 shell on macOS Sierra:
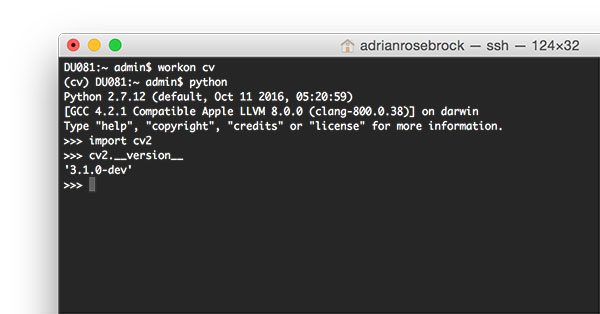
Figure 10: Ensuring that I can successfully import my OpenCV 3 + Python 2.7 bindings on macOS.
Congratulations, you have installed OpenCV 3 with Python 2.7 bindings on your macOS system!
So, what’s next?
Congrats! You now have a brand new, fresh install of OpenCV on your macOS system — and I’m sure you’re just itching to leverage your install to build some awesome computer vision apps…
…but I’m also willing to bet that you’re just getting started learning computer vision and OpenCV, and probably feeling a bit confused and overwhelmed on exactly where to start.
Personally, I’m a big fan of learning by example, so a good first step would be to have some fun and read this blog post on detecting cats in images/videos. This tutorial is meant to be very hands-on and demonstrate how you can (quickly) build a Python + OpenCV application to detect the presence of cats in images.
And if you’re really interested in leveling-up your computer vision skills, you should definitely check out my book, Practical Python and OpenCV + Case Studies. My book not only covers the basics of computer vision and image processing, but also teaches you how to solve real-world computer vision problems including face detection in images and video streams, object tracking in video, and handwriting recognition.

So, let’s put that fresh install of OpenCV 3 on your macOS system to good use — just click here to learn more about the real-world projects you can solve using Practical Python and OpenCV.
Summary
In this blog post I demonstrated how to install OpenCV 3 with Python 2.7 bindings on macOS Sierra and above.
Next week I’ll have a second tutorial, this one covering OpenCV 3 with Python 3.5 bindings on macOS.
For more OpenCV install tutorials on other operating systems (such as Ubuntu, Raspbian, etc.), please refer to this page where I provide additional links and resources.
But before you go
If your’e interested in learning more about OpenCV, computer vision, and image processing be sure to enter your email address in the form below to be notified when new blog posts + tutorials are published!
The post macOS: Install OpenCV 3 and Python 2.7 appeared first on PyImageSearch.