Last week I covered how to install OpenCV 3 with Python 2.7 bindings on macOS Sierra and above.
In today’s tutorial we’ll learn how to install OpenCV 3 with Python 3.5 bindings on macOS.
I decided to break these install tutorials into two separate guides to keep them well organized and easy to follow.
To learn how to install OpenCV 3 with Python 3.5 bindings on your macOS system, just keep reading.
macOS: Install OpenCV 3 and Python 3.5
As I mentioned in the introduction to this post, I spent last week covering how to install OpenCV 3 with Python 2.7 bindings on macOS.
Many of the steps in last week’s tutorial and today’s tutorial are very similar (and in some cases identical) so I’ve tried to trim down some of the explanations for each step to reduce redundancy. If you find any step confusing or troublesome I would suggest referring to the OpenCV 3 + Python 2.7 tutorial where I have provided more insight.
The exception to this is “Step #7: Configure OpenCV 3 and Python 3.5 via CMake on macOS” where I provide an extremely thorough walkthrough on how to configure your OpenCV build. You should pay extra special attention to this step to ensure your OpenCV build has been configured correctly.
With all that said, let’s go ahead and install OpenCV 3 with Python 3.5 bindings on macOS.
Step #1: Install Xcode
Before we can compile OpenCV on our system, we first need to install Xcode, Apple’s set of software development tools for the Mac Operating System.
The easiest method to download Xcode is to open up the App Store application on your desktop, search for “Xcode” in the search bar, and then click the “Get” button:
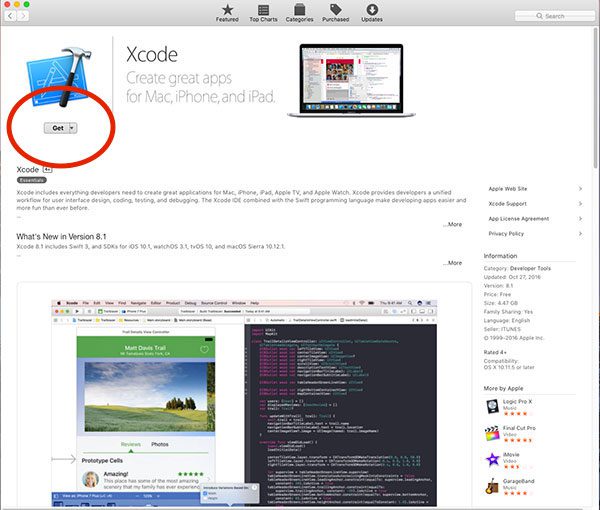
Figure 1: Downloading and installing Xcode on macOS.
After installing Xcode you’ll want to open up a terminal and ensure you have accepted the developer license:
$ sudo xcodebuild -license
We also need to install the Apple Command Line Tools. These tools include programs and libraries such as GCC, make, clang, etc. You can use the following command to install the Apple Command Line Tools:
$ sudo xcode-select --install
When executing the above command a confirmation window will pop up asking for you to confirm the install:
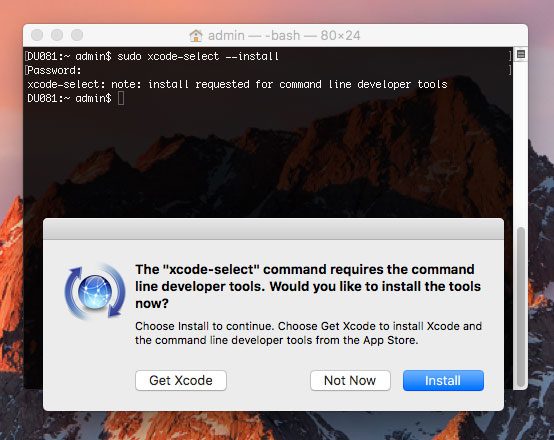
Figure 2: Installing the Apple Command Line Tools on macOS.
Click the “Install” button to continue. The actual installation process should take less than 5 minutes to complete.
Step #2: Install Homebrew
The next step is to install Homebrew, a package manager for macOS. You can think of Homebrew as the macOS equivalent of Ubuntu/Debian-based apt-get.
Installing Homebrew itself is super easy, just copy and paste the entire command below:
$ /usr/bin/ruby -e "$(curl -fsSL https://raw.githubusercontent.com/Homebrew/install/master/install)"
Once Homebrew is installed you should make sure the package definitions are up to date by running:
$ brew update
We now need to update our
~/.bash_profilefile (or create it if it doesn’t exist already). Open up the file using your favorite text editor (I’m using
nanoin this case):
$ nano ~/.bash_profile
And then add the following lines to the file:
# Homebrew
export PATH=/usr/local/bin:$PATH
This
exportcommand simply updates the
PATHvariable to look for binaries/libraries along the Homebrew path before the system path is consulted.
I have included a screenshot of what my
~/.bash_profilelooks like as reference below:
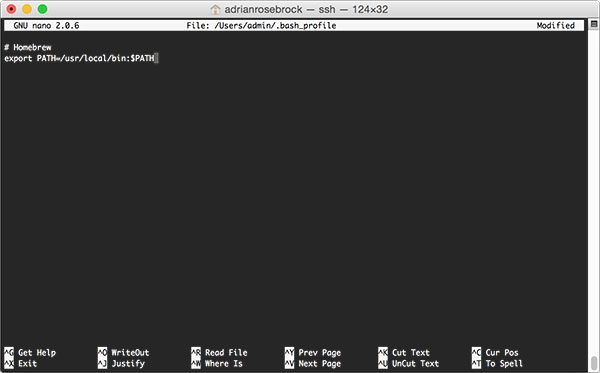
Figure 3: Updating my .bash_profile file to include Homebrew.
After updating your
.bash_profilefile, save and exitor the editor followed by using
sourceto ensure the changes to the
.bash_profileare manually reloaded:
$ source ~/.bash_profile
This command only needs to be executed once. Anytime you open up a new terminal your
.bash_profilewill automatically be
source‘d for you.
Step #3: Setup Homebrew for Python 3.5 and macOS
It is considered bad form to develop against the system Python as your main interpreter. The system version of Python should serve only one purpose — support system routines and operations. There is also the fact that macOS does not ship with Python 3 out of the box.
Instead, you should install your own version of Python that is independent from the system install. Using Homebrew, we can install Python 3 using the following command:
$ brew install python3
Note: Make sure you don’t forget the “3” in “python3”. The above command will install Python 3.5 on your system. However, if you leave off the “3” you’ll end up installing Python 2.7.
After the Python 3 install completes we need to create some symbolic links:
$ brew linkapps python3
As a sanity check, it’s important to confirm that you are using the Homebrew version of Python 3 rather than the system version of Python 3. To accomplish this, simply use the
whichcommand:
$ which python3
/usr/local/bin/python3
Important: Inspect this output closely. If you see
/usr/local/bin/python3then you are correctly using the Homebrew version of Python. However, if the output is
/usr/bin/python3then you are incorrectly using the system version of Python.
If you find yourself using the system version of Python instead of the Homebrew version you should:
- Ensure Homebrew installed without error.
- Check that
brew install python3
finished successfully. - You have properly updated your
~/.bash_profile
and reloaded the changes usingsource
. This basically boils down to making sure your~/.bash_profile
looks like mine above in Figure 3.
Step #4: Install Python virtual environments and NumPy
We’ve made good progress so far. We’ve installed a non-system version of Python 3 via Homebrew. However, let’s not stop there. Let’s install both virtualenv and virtualenvwrapper so we can create separate, independent Python environments for each project we are working on — this is considered a best practice when developing software in the Python programming language.
I’ve already discussed Python virtual environments ad nauseam in previous blog posts, so if you’re curious about how they work and why we use them, please refer to the first half of this blog post. I also highly recommend reading through this excellent tutorial on the RealPython.com blog that takes a deeper dive into Python virtual environments.
Install virtualenv and virtualenvwrapper
Installing both
virtualenvand
virtualenvwrapperis a snap using
pip:
$ pip install virtualenv virtualenvwrapper
After these packages have been installed we need to update our
~/.bash_profileagain:
$ nano ~/.bash_profile
Once opened, append the following lines to the file:
# Virtualenv/VirtualenvWrapper
source /usr/local/bin/virtualenvwrapper.sh
After updating, your
~/.bash_profileshould look similar to mine:
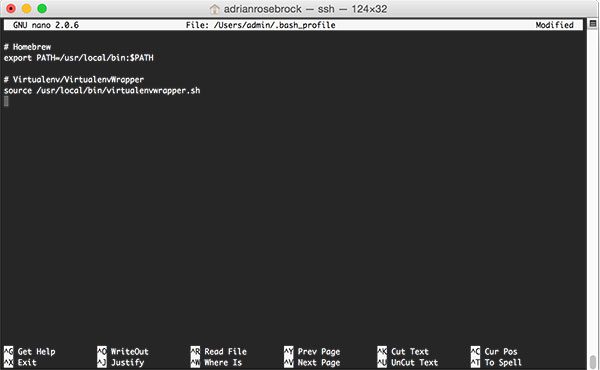
Figure 4: Updating your .bash_profile file to include virtualenv/virtualenvwrapper.
After updating your
.bash_profile, save it, exit, and then once again
sourceit:
$ source ~/.bash_profile
I’ll reiterate that this command only needs to be executed once. Each time you open up a new terminal window this file will automatically be
source‘d for you.
Create your Python 3 virtual environment
We can now use the
mkvirtualenvcommand to create a Python 3 virtual environment named
cv:
$ mkvirtualenv cv -p python3
The
-p python3switch ensures that a Python 3 virtual environment is created instead of a Python 2.7 one.
Again, the above command will create a Python environment named
cvthat is independent from all other Python environments on your system. This environment will have it’s own
site-packagesdirectory, etc., allowing you to avoid any type of library versioning issues across projects.
The
mkvirtualenvcommand only needs to be executed once. To access the
cvPython virtual environment after it has been created, just use the
workoncommand:
$ workon cv
To validate that you are in the
cvvirtual environment, just examine your command line. If you see the text
(cv)preceding the prompt, then you are are in the
cvvirtual environment:
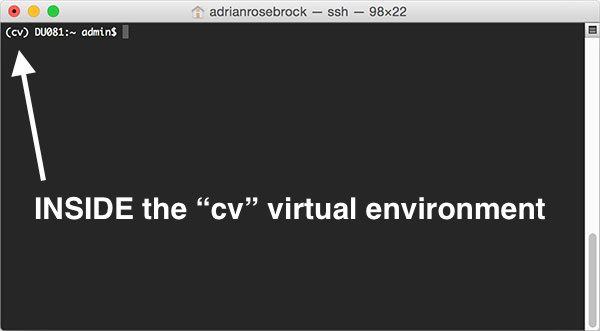
Figure 5: Make sure you see the “(cv)” text on your prompt, indicating that you are in the cv virtual environment.
Otherwise, if you do not see the
cvtext, then you are not in the
cvvirtual environment:
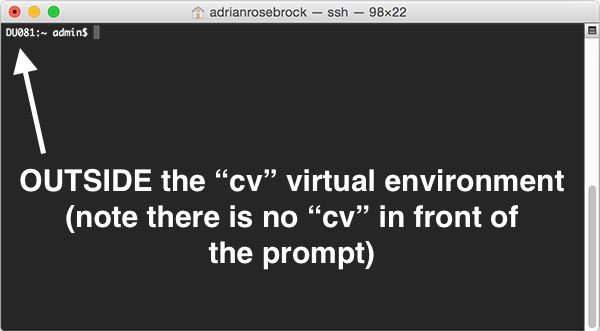
Figure 6: If you do not see the “(cv)” text on your prompt, then you are not in the cv virtual environment and you need to run the “workon” command to resolve this issue before continuing.
If you find yourself in this situation all you need to do is utilize the
workoncommand mentioned above.
Install NumPy
The only Python-based prerequisite that OpenCV needs is NumPy, a scientific computing package.
To install NumPy into our
cvvirtual environment, ensure you are in the
cvenvironment (otherwise NumPy will be installed into the system version of Python) and then utilize
pipto handle the actual installation:
$ pip install numpy
Step #5: Install OpenCV prerequisites using Homebrew
OpenCV requires a few prerequisites to be installed before we compile it. These packages are related to either (1) tools used to build and compile, (2) libraries used for image I/O operations (i.e., loading various image file formats from disk such as JPEG, PNG, TIFF, etc.) or (3) optimization libraries.
To install these prerequisites for OpenCV on macOS execute the following commands:
$ brew install cmake pkg-config
$ brew install jpeg libpng libtiff openexr
$ brew install eigen tbb
Step #6: Download the OpenCV 3 source from GitHub
As I detailed in last week’s tutorial, OpenCV 3 on macOS needs to be compiled via the latest commit to GitHub instead of an actual tagged release (i.e., 3.0, 3.1, etc.). This is because the current tagged releases of OpenCV do not provide fixes for the QTKit vs. AVFoundation errors (please see last week’s blog post for a thorough discussion on this).
First, we need to download the OpenCV GitHub repo:
$ cd ~
$ git clone https://github.com/opencv/opencv
Followed by the opencv_contrib repo:
$ git clone https://github.com/opencv/opencv_contrib
Step #7: Configure OpenCV and Python 3.5 via CMake on macOS
This section of the tutorial is the most challenging and the one that you’ll want to pay the most attention to.
First, I’ll demonstrate how to setup your build by creating the a
builddirectory.
I then provide a CMake template that you can use to start the process of compiling OpenCV 3 with Python 3.5 bindings on macOS. This template requires you to fill in two values:
- The path to your
libpython3.5.dylib
file. - The path to your
Python.h
headers for Python 3.5.
I will help you find and determine the correct values for these paths.
Finally, I provide a fully completed CMake command as an example. Please note that is command is specific to my machine. Your CMake command may be slightly different due to the paths specified. Please read the rest of this section for details.
Setting up the build
In order to compile OpenCV with Python 3.5 bindings for macOS we first need to set up the build. This simply amounts to changing directories and creating a
builddirectory:
$ cd ~/opencv
$ mkdir build
$ cd build
OpenCV 3 + Python 3.5 CMake template for macOS
The next part, where we configure our actual build, gets a little tricky. In order to make this process easier I have constructed the following OpenCV 3 + Python 3.5 CMake template:
$ cmake -D CMAKE_BUILD_TYPE=RELEASE \
    -D CMAKE_INSTALL_PREFIX=/usr/local \
    -D OPENCV_EXTRA_MODULES_PATH=~/opencv_contrib/modules \
    -D PYTHON3_LIBRARY=YYY \
    -D PYTHON3_INCLUDE_DIR=ZZZ \
    -D PYTHON3_EXECUTABLE=$VIRTUAL_ENV/bin/python \
    -D BUILD_opencv_python2=OFF \
    -D BUILD_opencv_python3=ON \
    -D INSTALL_PYTHON_EXAMPLES=ON \
    -D INSTALL_C_EXAMPLES=OFF \
    -D BUILD_EXAMPLES=ON ..
Looking at this template I want to point out a few things to you:
BUILD_opencv_python2=OFF
: This switch indicates that we do not want to build Python 2.7 bindings. This needs to be explicity stated in the CMake command. Failure to do this can cause problems when we actually run CMake.BUILD_opencv_python3=ON
: We would like for OpenCV 3 + Python 3.5 bindings to be built. This instruction indicates to CMake that the Python 3.5 binding should be built rather than Python 2.7.PYTHON3_LIBRARY=YYY
: This is the first value that you need to fill in yourself. You need to replaceYYY
with the path to yourlibpython3.5.dylib
file. I will hep you find the path to this value in the next section.PYTHON3_INCLUDE_DIR=ZZZ
: This is the second value that you need to fill in. You will need to replaceZZZ
with the path to yourPython.h
headers. Again, I will help you determine this path.
Determining your Python 3.5 library and include directory
We will start by configuring your
PYTHON3_LIBRARYvalue. This switch should point to your
libpython3.5.dylibfile. This file is located within many nested subdirectories of
/usr/local/Cellar/python. To find the exact path to the
libpython3.5.dylibfile, just use the
lscommand with a wildcard (auto-tab complete also works as well):
$ ls /usr/local/Cellar/python3/3.*/Frameworks/Python.framework/Versions/3.5/lib/python3.5/config-3.5m/libpython3.5.dylib
/usr/local/Cellar/python3/3.5.2_3/Frameworks/Python.framework/Versions/3.5/lib/python3.5/config-3.5m/libpython3.5.dylib
Take note of the output of this command — this is the full path to your libpython3.5.dylib
file and will replace YYY
in the CMake template above.
Let’s move along to determining the
PYTHON3_INCLUDE_DIRvariable. This path should point to the
Python.hheader files for Python 3.5 used to generate the actual OpenCV 3 + Python 3.5 bindings.
Again, we’ll use the same
lsand wildcard trick here to determine the proper path:
$ ls -d /usr/local/Cellar/python3/3.*/Frameworks/Python.framework/Versions/3.5/include/python3.5m/
/usr/local/Cellar/python3/3.5.2_3/Frameworks/Python.framework/Versions/3.5/include/python3.5m/
The output of the
ls -dcommand is our full path to the
Python.hheaders. This value will replace
ZZZin the CMake template.
Filling in the CMake template
Now that we’ve determined the
PYTHON3_LIBRARYand
PYTHON3_INCLUDE_DIRvalues we need to update the CMake command to reflect these paths.
On my machine, the full CMake command to configure my OpenCV 3 + Python 3.5 build looks like:
$ cmake -D CMAKE_BUILD_TYPE=RELEASE \
    -D CMAKE_INSTALL_PREFIX=/usr/local \
    -D OPENCV_EXTRA_MODULES_PATH=~/opencv_contrib/modules \
    -D PYTHON3_LIBRARY=/usr/local/Cellar/python3/3.5.2_3/Frameworks/Python.framework/Versions/3.5/lib/python3.5/config-3.5m/libpython3.5.dylib \
    -D PYTHON3_INCLUDE_DIR=/usr/local/Cellar/python3/3.5.2_3/Frameworks/Python.framework/Versions/3.5/include/python3.5m/ \
    -D PYTHON3_EXECUTABLE=$VIRTUAL_ENV/bin/python \
    -D BUILD_opencv_python2=OFF \
    -D BUILD_opencv_python3=ON \
    -D INSTALL_PYTHON_EXAMPLES=ON \
    -D INSTALL_C_EXAMPLES=OFF \
    -D BUILD_EXAMPLES=ON ..
However, please do not copy and paste my exact CMake command — make sure you have used the instructions above to properly determine your
PYTHON3_LIBRARYand
PYTHON3_INCLUDE_DIRvalues.
Once you’ve filled in these values, execute your
cmakecommand and your OpenCV 3 + Python 3.5 build will be configured.
As an example, take a look at the
Python 3section output from my configuration:
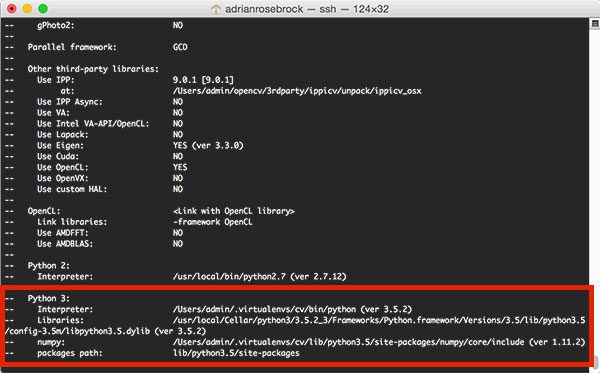
Figure 7: Ensuring that Python 3.5 will be used when compiling OpenCV 3 for macOS.
In particular, you’ll want to make sure that:
- The
Interpreter
points to the Python binary in yourcv
virtual environment. Libraries
points to yourlibpython3.5.dylib
file.- The
numpy
version being utilized is the one you installed in yourcv
virtual environment.
Step #8: Compile and install OpenCV 3 on macOS
After investigating your
cmakecommand and ensuring it exited without error (and that the
Python 3section was properly configured), you can now compile OpenCV:
$ make -j4
In this case, I am supplying
-j4to compile OpenCV using all four cores on my machine. You can tune this value based on the number of processors/cores you have.
OpenCV can take awhile to compile, anywhere from 30-90 minutes, depending on your system specs. I would consider going for a nice long walk while it compiles.
A successful compile will end with a 100% completion:
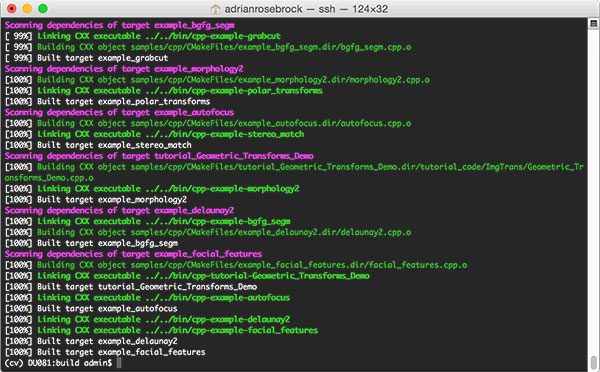
Figure 8: Successfully compiling OpenCV 3 from source with Python 3.5 bindings on macOS.
Assuming that OpenCV compiled without error, you can now install it on your macOS system:
$ sudo make install
Step #9: Rename and sym-link your OpenCV 3 + Python 3.5 bindings
After running
sudo make installyour OpenCV 3 + Python 3.5 bindings should be located in
/usr/local/lib/python3.5/site-packages. You can verify this by using the
lscommand:
$ cd /usr/local/lib/python3.5/site-packages/
$ ls -l *.so
-rwxr-xr-x  1 root  admin  3694564 Nov 15 11:28 cv2.cpython-35m-darwin.so
I’ve been perplexed by this behavior ever since OpenCV 3 was released, but for some reason, when compiling OpenCV with Python 3 support enabled the output
cv2.sobindings are named differently. The actual filename will vary a bit depending on your system architecture, but it should look something like
cv2.cpython-35m-darwin.so.
Again, I don’t know exactly why this happens, but it’s an easy fix. All we need to do is rename the file to
cv2.so:
$ cd /usr/local/lib/python3.5/site-packages/
$ mv cv2.cpython-35m-darwin.so cv2.so
$ cd ~
After renaming
cv2.cpython-35m-darwin.soto
cv2.sowe then need to sym-link our OpenCV bindings into the
cvvirtual environment for Python 3.5:
$ cd ~/.virtualenvs/cv/lib/python3.5/site-packages/
$ ln -s /usr/local/lib/python3.5/site-packages/cv2.so cv2.so
$ cd ~
Step #10: Verify your OpenCV 3 install on macOS
To verify that your OpenCV 3 + Python 3.5 installation on macOS is working you should:
- Open up a new terminal.
- Execute the
workon
command to access thecv
Python virtual environment. - Attempt to import the Python + OpenCV bindings.
Here are the exact steps you can use to test the install:
$ workon cv
$ python
Python 3.5.2 (default, Oct 11 2016, 04:59:56)
[GCC 4.2.1 Compatible Apple LLVM 8.0.0 (clang-800.0.38)] on darwin
Type "help", "copyright", "credits" or "license" for more information.
>>> import cv2
>>> cv2.__version__
'3.1.0-dev'
>>>
Note: Take note of the -dev
in the cv2.__version__
. This indicates that we are using the development version of OpenCV and not a tagged release. Once OpenCV 3.2 is released these instructions can be updated to simply download a .zip of the tagged version rather than having to clone down the entire repositories.
I’ve also included a screenshot below that utilizes these same steps. As you can see, I can access my OpenCV 3 bindings from Python 3.5 shell:
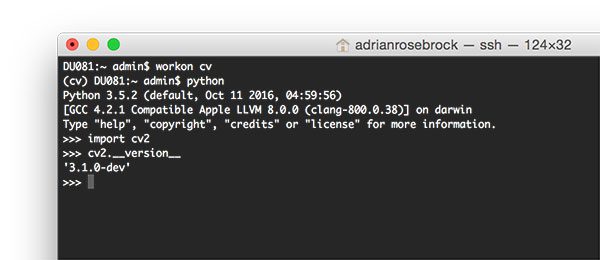
Figure 9: Ensuring that I have successfully installed my OpenCV 3 + Python 3.5 bindings on macOS.
Congratulations, you have installed OpenCV with Python 3.5 bindings on your macOS system!
So, what’s next?
Congrats! You now have a brand new, fresh install of OpenCV on your macOS system — and I’m sure you’re just itching to leverage your install to build some awesome computer vision apps…
…but I’m also willing to bet that you’re just getting started learning computer vision and OpenCV, and probably feeling a bit confused and overwhelmed on exactly where to start.
Personally, I’m a big fan of learning by example, so a good first step would be to have some fun and read this blog post on detecting cats in images/videos. This tutorial is meant to be very hands-on and demonstrate how you can (quickly) build a Python + OpenCV application to detect the presence of cats in images.
And if you’re really interested in leveling-up your computer vision skills, you should definitely check out my book, Practical Python and OpenCV + Case Studies. My book not only covers the basics of computer vision and image processing, but also teaches you how to solve real-world computer vision problems including face detection in images and video streams, object tracking in video, and handwriting recognition.
So, let’s put that fresh install of OpenCV 3 on your macOS system to good use — just click here to learn more about the real-world projects you can solve using Practical Python and OpenCV.
Summary
In this tutorial you learned how to compile and install OpenCV 3 with Python 3.5 bindings on macOS Sierra.
To accomplish this, we configured and compiled OpenCV 3 by hand using the CMake utility. While this isn’t exactly the most “fun” experience, it does give us complete and total control over the install.
If you’re looking for an easier way to get OpenCV installed on your Mac system be sure to stay tuned for next week’s blog post where I demonstrate how to install OpenCV on macOS using nothing but Homebrew.
To be notified when this blog post goes live, please enter your email address in the form below and I’ll be sure to ping you when the tutorial is published.
The post macOS: Install OpenCV 3 and Python 3.5 appeared first on PyImageSearch.
